The Rise to SaaS module offers a comprehensive set of features and pricing packages options designed specifically for businesses looking to provide CRM functionality to their clients through a Software-as-a-Service (SaaS) model.
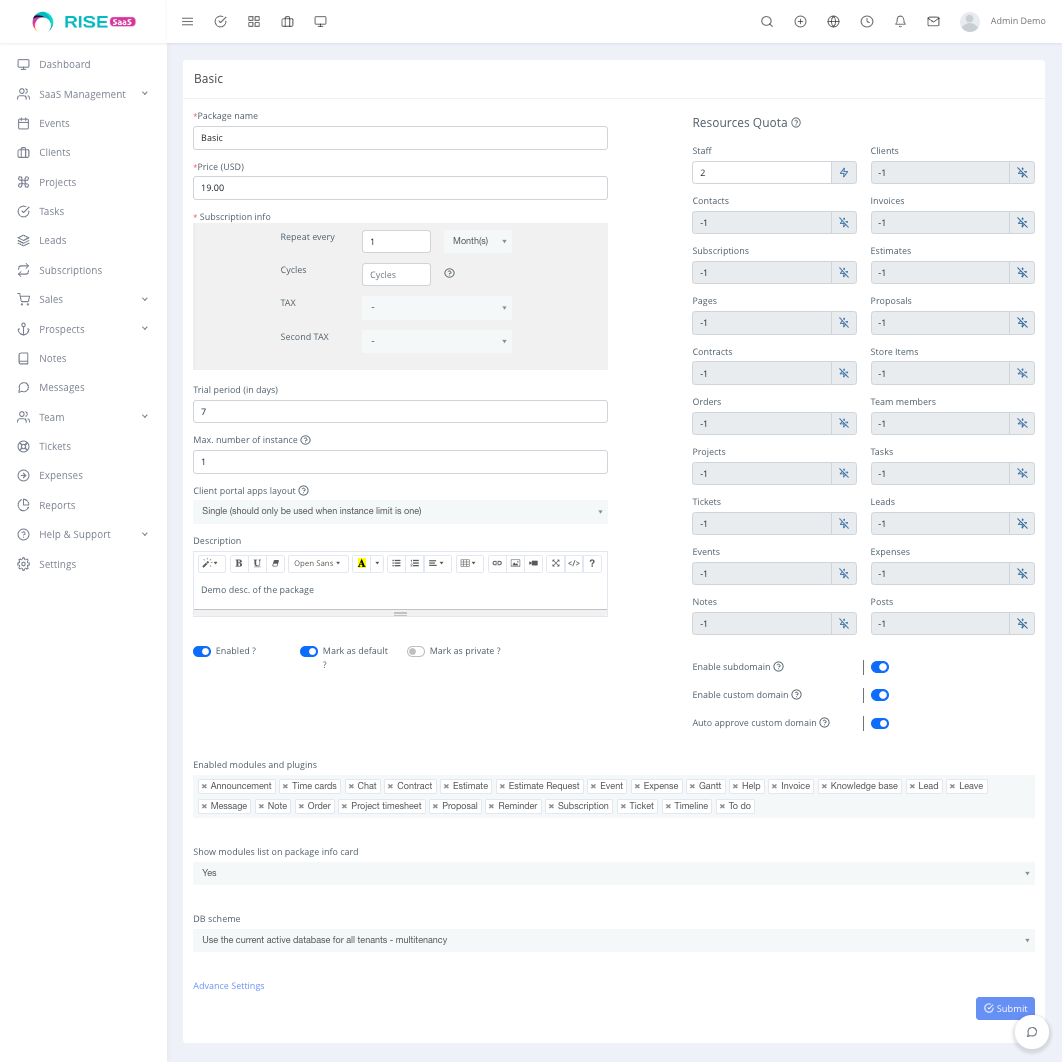
Create First Package
- Package Name
- Package Price
- Invoice recurring period, available options 1-12months
- Trial Period, (leave it blank if the package does not offer a trial period)
- Max Number of Instances (Leave it 0 for unlimited).
- Description, here additional features are available other than the modules. You can also use this for custom presentation of the package features.
- Client portal app theme: Select a theme for instances presentation. ‘Agency’ is suitable when allowed instance is greater than one and ‘Single’ should only be used when the instance is one. We give you this option as you might want to set an agency theme and limit instances to 1. This gives room to let the agency knows about the possibility of more instance (i.e upselling)
- Tax: select tax to be applied on the subscription
- Payment mode: select all the payment gateway that can be used for invoices payment on the package
- Enable/ Disable package: when disabled, user wont able to subscribe.
- Mark as default automatically assigns the package to new tenant registration
- Mark as private: makes the package either visible or invisible to the tenant.
- Modules: use to enable both internal modules and third-party plugins accessible in this package.
- Show the modules list on the package info card, this option allows you to hide or show the list of modules on the package card. This is helpful if you are using a custom presentation of the package through the description input.
- DB Scheme:
- Use the current active database for all tenants – multitenancy
- Use single database for each company instance. i.e separate database. You wont be shown this option if you current database user has no privilege to create new database
- Use a single database for each company from the pool only.
- Distribute companies data among the provided database in the pool – shading
- Advance Settings: Set system and module options that you want to share with companies on this package. Ensure you mask it as ‘Mask’ where necessary i.e., password, API keys, etc.
Masked fields are protected from direct display to companies on the settings form.
Advance Settings: Set system and module options that you want to share with companies on this package. Ensure you mark it as ‘Mask’ where necessary i.e., password, API keys, etc. Only Share necessary settings and it’s bad to share all.
By default, all tenants inherit settings from master admin at the time of seeding the tenant.
Ideally, there are situations where you may need to share certain settings that were not initially included during tenant seeding. This could involve third-party plugin settings or new information added after some tenants have already been deployed. For instance, if you install a module after creating tenants and wish to make the module available to both existing and future tenants, it’s crucial to consider shared settings, particularly those related to license verifications. This will enable you to share third-party license keys and essential configurations with other tenants effectively.
Another scenario is when you wish to share SMTP credentials or other sensitive information with a tenant. By default, such information is excluded during tenant seeding, and you have the option to share them. In such cases, it’s important to mask sensitive details, such as the SMTP password, to prevent direct access by tenants
Ensure you share necessary module fields like license fields e.t.c Otherwise, your tenant can often see error messages when the assigned module can not validate the license. Read each setting name to make a guess of what is meant for and decide if you want to share it or share, masked or even enforce it. You might want to share and enforce settings containing words like; verification key, last verification, product token, license key, purchase key, etc
“Masked” means the value should display as an asterisk (i.e. v***) to the user on the settings input page and not other pages and thus, masking is aimed for only sensitive information such as SMTP password, payment secret keys, etc and should be used with caution. This sensitive information is not often displayed on the UI other than the settings form page.
“Enforce” means the tenant will not be able to make an update to the settings and will be forced to use the super-admin value for such enforced settings. Otherwise, user values take preference when they are provided.
Note that this is experimental and you should ensure the masked information works for your needs i.e. hidden away from the user. Settings with less than two characters will not be masked, likewise any of ‘0’, ‘1’, ‘yes’, ‘no’, ‘-‘
Resources Quota
This allows for limiting the use of resources, set to -1 for unlimited. You can use the input decorator to switch between limited and unlimited
This setting allows you unlimited power to control your clients’ access to resources based on your particular business model.
Subdomain, Custom Domains, Auto Approve Custom Domain
Subdomains
Tenants on this package will be able to access their instances using subdomains. This requires that you have a wild card SSL setup on your installation domain.
Here is how to create a subdomain on Cpanel
- Login to your Cpanel where your www.companydomain.com is hosted
- Search for Domains >> Subdomains
- Create a new subdomain using the slug you desire e,g crm.comapnydomain.com.
- Then select the same “Document Root” as that of the Rise CRM installation
Preferably, we advise you to set up wildcard domain entry and SSL, this will ensure you don’t have to do manual entry for each tenant and the subdomain will be automated. Click here to read more on setting up a wildcard addon/alias domain
Custom Domains
Tenants on this package will be able to access their instances using their own custom domain.
Custom Domain can be done in two ways: A-record and CNAME
- A-record: you need to provide the customer with your server’s public IP address. The customer makes an A-record on their domain DNS management portal using your IP address. This option is interesting as it allows customers to point any domain including the root domain i.e. customerdomain.com to their instance with you.
This setup requires a full setup of SSL for the customer domain on your server. On-demand TLS provided by web servers like Caddy makes it the best option for this kind of setup on VPS. Thus you can enable auto-approve custom domains as the domain will automatically be served on HTTPS using SSL on demand.
On shared hosting, you need to disable auto-approve custom domains. When a customer adds a new domain or registers with a custom domain, you will receive a notification and the instance will be highlighted on the tenant list for approval. Before approval on shared hosting, you might need to add the customer custom domain as an alias or separate domain to your system, however, you need to use the same “document root” as that of Rise CRM installation when creating the domain for your customer on your Cpanel or hosting panel. Reach out to your hosting company for further assistance.
We however discourage this method for a shared hosting environment. - CNAME: the customer simply needs to make a CNAME record from their domain DNS management portal to their tenancy domain on your SaaS platform. i.e. forward crm.customerdomain.com to tenantid.yoursaasdomain.com
When you configure the DNS rightly, the SaaS module will handle its mapping to the tenant. When properly configured (wildcard or custom domain) it should be serving the same content of your SaaS setup.
We don’t provide support for setup and you should reach out to your hosting provider for assistance regarding this.
Auto Approve Custom Domains
Enable this option if you have automated the custom domain setup and SSL handling for custom domains


